-
Holiday Candles
PFD®
Little is known about the origin of candles. Credit for developing the wick candle goes to the Romans. Early-day candles were made of tallow, which smoked and gave off an acrid odor. While beeswax candles did not appear until the Middle Ages. Today, the range of color, size and shape of candles is truly amazing. Candles are now used more for mood and less for light. The current simplicity trend has made aromatherapy popular. Holiday candles add enticing scent to your customer's home.
|
Floral Blueprints
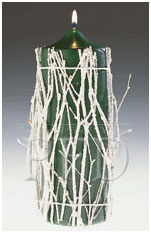
Hedged Candle
- Tape two pieces of No. 20 florist wire and lay them on table side-by-side, like rails of a train track. For a 9" candle, the wires should be placed about 7" apart.
- Place iridescent twigs flat atop the wire, like railroad ties across the rails.
- Lay candle on twigs. Holding wires in place, roll candle until wires meet. Twist wires together and reposition twigs if needed.
- Prune twigs straight across top and bottom of candle.
|
|
Floral Blueprints
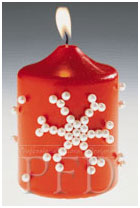
Pearl Snowflakes
- Using wire cutters and box of pearl-headed corsage pins, cut pins to length of 1/4 to 1/3 of an inch.
- Put pins into wax candle surface. Start at center, work outward.
- It may be helpful to lightly etch main lines of the snowflake pattern into the wax before you begin placing the pins.
|
|
Floral Blueprints
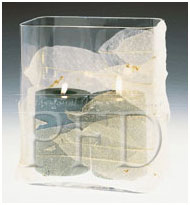
Skeleton Leaf Votive
- Select a suitable glass base or container.
- Place a piece of wax floral tissue on design table. Lay selected leaf flat onto tissue and spray with Design Master's Tack 1000. Spray leaves individually to avoid having to reapply adhesive.
- Place leaves on vase in desired pattern. Keep materials away from edge of vase to avoid fire hazard. Place one or two short candles into bottom of vase.
|
|
Floral Blueprints
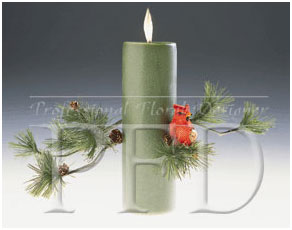
Glowing Evergreen
- Select column candle at least 9" tall.
- Use electric drill with a small bit and drill hole about 1/2" deep on each side of candle. Position holes as desired. In design at left, they're about half way up the candle's side.
- Select two small pieces of permanent pine material. Scraps from other floral designs work perfectly and save money.
- Dip ends of pine branches into pan glue and insert in drilled holes.
- Shape branches as desired. Glue small pine cones and bird into place for added interest.
|
|
Floral Blueprints
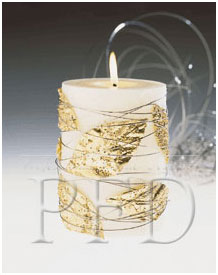
Silver and Gold Spiral
- Select similar candle to one pictured. Put wax floral tissue onto work surface. Lay eight metallic leaves face down on tissue.
- Spray backside of each leaf with Design Master's Tack 1000. Randomly put glued leaves on candle. Rap candle with decorative wire, covering metallic leaves.
|
|
Floral Blueprints
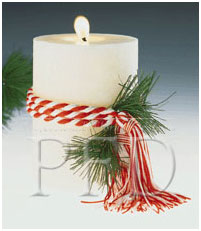
Tie One On
- Select column candle and a length of fancy cording with tassels. Pin cording half way up candle. Wrap cording around candle and secure with corsage pin.
- Hot glue pieces of permanent evergreen to "knotted" area near tassels. This is a profitable way to use up scraps of leftover materials.
|
Copyright © 2026 Teleflora. All rights reserved.